Categories
XBMC using Network Boot
Wednesday, January 1. 2014
OVERVIEW:
Over the years I have used many different Network Media Players, both PC and hardware based systems. So far for ease of use and operation, including the ability to load ISO files directly of your media library. I find XBMC (Xbox Media Centre) one of the best around. With the available cut down versions like OpenELEC, capable of running from flash card or USB drives or in this case over the Network.
In this document I will give a guide into getting a home media server working and booting from Network Boot (PXE). With some more work you could expand on this guide, enabling Network Booting of many other Utilities or Operating Systems.
For those who are not familiar with PXE (Pre eXecution Environment) it has been around since about 1999-2000. PXE can be used on any system that supports PXE booting in the System Bios. Normally it can be set as the default boot option if needed, or selected via boot options on pressing the F12 button or similar on staring your PC.
PXE can be used for many things and once setup on your network can be a very handy tool. For example if you have multiple identical PCs, you could setup one pc as you like, then image that PC with a server such as FOG (a free Linux Imaging solution). (although I have setup FOG in the past I will not be covering that here)
Along with imaging solutions PXE can boot multiple Operating Systems over the network. Generally they would be cut down versions, they could be anything from system diagnostics utilities through to media players like OpenELEC, as in this example.
Multiple boot options can be setup on a selectable menu system, this allows any number of boot options from the same PXE server. In this example I am using my FreeNAS Server as the PXE Server.
The things needed to enable PXE booting on your network are as follow:
- A DHCP Server that can pass DHCP Options to client PCs.
- A TFTP Server.
- A File Server that can share NFS file shares.
- Some time and patients :-)
In this guide I am not going to cover multiple Server/File Server setups, as you should be able to work out what is needed on your Network from this guide. If already running a standard hardware based file Server with your Music etc already loaded, maybe that server can already share the TFTP and NFS. All you would need in that scenario is a DHCP server that can be setup to pass the PXE options to your PCs.
The way PXE works (Handy to know for Fault finding later)
Once you switch on a PC it goes through its boot process starting with the Bios loading, on checking the boot order most PCs are setup with the first option to boot from Hard Drive. If this is changed to "Network" on the next reboot the PC will look for a Network Boot Server. (Some PCs also have other options that need turning on under the Bios Network options)
The DHCP Client on the PC then looks for a DHCP Server. If the DCHP Server is found but it does not issue the PXE options, the PC will normally fall back to booting from the Hard Drive. If the DHCP is setup correctly to pass the PXE Options then the PC will go into PXE Boot, looking for the TFTP File Server and Boot File specified in the DHCP Server.
If the TFTP Server or the file is not found the PXE boot will fail, resulting in an error message and maybe the PC booting to its normal Hard Drive. If this happens it would most likely be one of three things...
- The DHCP Server is not configured correctly
- The TFTP Server is not running/configured correctly
- The File specified is not correct
Assuming that the file has been found (in this guide I will be using "PXELinux")
your PC will then start PXELinux. It will load the gpxelinux.0 and associated files, followed by a configuration file. The configuration file is explained more later in this guide.
Depending on what options have been set, the configuration file will then instruct the PC on what to do. All going well it will display options or boot into your selected Operating System (OS).
If the system begins to boot, or you selected a boot option, it should switch over to loading the required files from the specified NFS file share. if you get this far and then get an error message you will need to check the following:
- The NFS file shares have the correct permissions
- The PC has enough RAM etc to run the OS Selected
But all going well your PC should be booting into the OS.
Step 1 - Installing the DHCP Server on FreeNAS:
In this guide I am assuming that you already have a FreeNAS server setup and running, if not visit http://www.freenas.org for more information. You may decide to setup a separate DHCP Sever depending on your network.
You may already have a DHCP Server running on a Firewall or Router, but for Network Booting, you will need to be running a DHCP server that is configurable with options. Most basic DHCP servers on routers etc do not allow Options to be set on the DHCP server.
Note: (If reading this guide I assume you should already know that you can only have one DHCP server on a network, so if you decide to setup a new DHCP Server you must stop the old one)
In my case I was already running a FreeNAS Server on my network, so I worked out the best way to utilise what I already had to do the job.
FreeNAS 9.1.0 onwards has a pre installed option called Jails, this can be enabled to allow the running of other FreeBSD Operating Systems. Effectively these additional operating systems are Virtual Operating Systems as they are running and controlled within FreeNAS.
On my FreeNAS server all I did was create a folder called Jails, on one of the standard Samba file shares used for my Network. In my case security is not really a concern on my network, create a hidden or non accessible Directory if security is an issue.
Once you have created a directory the next step is to log into your FreeNAS server and select "Jails" from the top Menu. Click Configuration and you should see the following options... (the shown is just for ref as the settings should reflect your network)
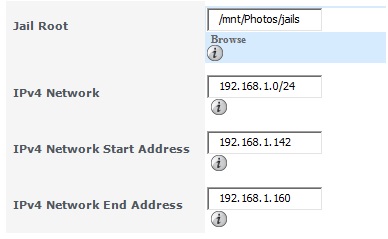
Jail Root - should be pointed to the Jail Directory you created earlier.
IPv4 Network - should be set to your desired network typically ending with ".0/24"
IPv4 Network Start Address and End Address - should be set to a range that will not be used by your DHCP Server to issue IP Addresses, and no other device on your network uses. (this will be the range that any Jail OS setups will use)
Save the Configuration and then click the "Jails" tab near "Configuration", click "Add Jail", click "Advanced Mode" that should show the following.
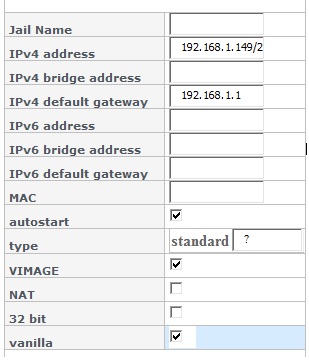
Give the Jail a name like "DHCP-Server"
Set the "IPv4 default gateway" this will be your internet routers IP.
Make sure "autostart", "VIMAGE" and "vanilla" are Selected then click "OK".
Once you have clicked ok this step can take a while as it downloads and installs a new FreeBSD image.
(if you have any problems with the FreeNAS Jails setup refer to the FreeNAS forums)
Once the Jail Install has completed, the Virtual Machine should start running. (you may need to reboot your FreeNAS server, this may overcome any issues connecting to your Virtual Machine via SSH in the next steps)
I setup and configured the DHCP server from SSH, but if not that familiar with SSH, Webmin can be installed as follows to help, still requires some SSH.
Download an app called PuTTY.exe from http://www.putty.org click the You can download PuTTY here. link
On FreeNAS the SSH Service may have to be started, this is found on the Services Tab on the top menu of FreeNAS. On the SSH option make the settings the same as follows and click "ok".
Click the ON/OFF button to start the SSH Service.
![]()
Once you have PuTTY and have checked SSH is Running, run PuTTY and connect to your FreeNAS server via an SSH connection. This will be the IP Address of the actual FreeNAS server not the Virtual Machine. The settings in PuTTY remain as they are, just type the IP Address of your FreeNAS Server in the "Host Name" box and click open. this should open the SSH login window to your FreeNAS Server. The Username will be "root" and the Password will be your standard FreeNAS password.
Now you have connected to your FreeNAS server with SSH, you will need to log into your Virtual Machine this can be done by typing the following commands at the prompt:
jls -v
This will display the Active virtual Machines running, the number at the start is the system number used on the next command.
1 DHCP-Server /mnt/Photos/jails/DHCP
1 ACTIVE
Again at the prompt type the following replacing the 1 with what ever number your DHCP-Server is listed as:
jexec 1 csh
You should now see a new command prompt saying root@DHCP-Server:/ # or what ever you named your Virtual Machine.
Now issue a few commands to the SSH to Install Webmin and the DHCP Server.
To install Webmin type the following commands shown in bold and wait for each step to complete.
- root@DHCP-Server:/ # pkg_add -r webmin
- root@DHCP-Server:/ # echo 'webmin_enable="YES"' >> /etc/rc.conf
- root@DHCP-Server:/ # /usr/local/lib/webmin/setup.sh
The last command starts the Webmin configuration setup, because this is a stand alone DHCP Server I changed the port from 10000 to 80 the default HTTP port.I also selected "no" for Use SSL as the security of my DHCP Server is not that critical on my home network. The username and password can be set as you like (although I would suggest leaving the user as "admin" and setting the password the same as your FreeNAS box)
After the script finishes running you can then start the Webmin Service by the following command:
- root@DHCP-Server:/ # service webmin start
Next issue the following three commands ready for the DHCP Server install shortly.
- root@DHCP-Server:/ # portsnap fetch
- root@DHCP-Server:/ # portsnap extract
- root@DHCP-Server:/ # echo 'dhcpd_enable="YES"' >> /etc/rc.conf
Now login to Webmin from your web browser, this is done via the IP Address of the new Virtual Machine - DHCP-Sever in my case http://192.168.1.144
The following screen should display.

Login using the username and password set previously, once logged in change the Webmin Theme (Your Choice) but this is done via the "Webmin", "Webmin Configuration", "Webmin Themes" option. I personally prefer the "MSC.Linux Theme" for its ease of navigation.
If now using the MSC Theme choose the Servers tab at the top of the Webmin page or find it in the list, and then select the "DHCP Server" from the displayed list. It should now say that the "ISC-DHCPD" server is not install and you can use Webmin to install it by clicking here, click and allow Webmin to install the DHCP-Server.
After about 1 minute, scroll to the bottom of the page it should show complete. Find your way back to the main DHCP Server page, you may have a bunch of example data setup in your DHCP server. Select all the default "Subnets and Shared Networks" and click "Delete Selected" do the same for the "Hosts and Host Groups"
The next step will be to click "Add a New Subnet" under the "DHCP Server" as the following two images show.

The options that have to be set are as follow:
Subnet description: this can be set but not essential can be handy later maybe.
Network Address: this needs to be XXX.XXX.XXX.0 if unsure of your current network check you existing router or network interface configuration. My network for example is 192.168.1.0
Netmask: this will generally be 255.255.255.0 unless you have some reason to make it different like more subnets or want to limit the network to a specific range of IPs.
Address ranges: this needs to be similar or the same as your existing DHCP Server, keeping in mind any devices like Printers etc that may have set IP addresses.
In my case I have set the start IP as 192.168.1.100 and the end to 192.168.1.120
Boot filename: in this guide the boot file will be gpxelinux.0 (that is a zero on the end not a letter)
Boot file server: this will be the IP address of the TFTP server in this example that will be the FreeNAS servers main IP address, in my case it is 192.168.1.254
Default lease time: set this as you like, I set mine high as originally it was very low and occasionally caused issues on some devices.
Maximum lease time: this can be set as you like also. There are recommendations on these settings especially if you have a larger Network but for small home networks it will be fine.
Click the save button at the bottom of the page, now click "Module Config" at the top of the page.
Near the bottom of the page you will see the following line.
![]()
Change the selection to none and then click "Save" at the bottom of the page.
At this point we are done with the DHCP server, we will come back to it later on.
Step 2 - Setting up the NFS and TFTP Servers.
The first thing to do is create a directory on your FreeNAS server that will host all the TFTP and NFS files. For ease I created one Directory "PXEBoot/TFTP" I created that in a standard SAMBA file share Directory, making it easily accessed from Windows based machines on the Network. As later files will need to be edited and copied to this Directory.
Next log onto your FreeNAS Server and click the "Services" tab, followed by the TFTP Configuration (the wee spanner beside TFTP).
The following will display.
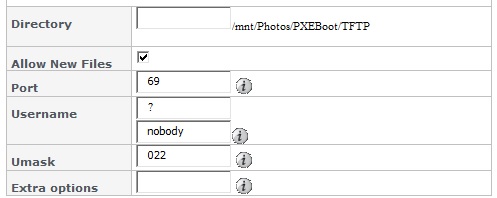
Browse to your newly created TFTP Directory, in my case it was "/mnt/Photos/PXEBoot/TFTP"
Tick "Allow New Files"
Set the port to "69" if not already
For ease of operation I again set the username to "nobody"
Set the Umask to the correct one for the user "nobody"
Make the changes here and then click "Save"
![]()
Click the "ON/OFF" option for the TFTP service and it should start running
Next start the NFS Service the same way, you may need to set the IP Address and Number of servers before the NFS will start. The IP Address will be the FreeNAS Server IP Address and the number of servers I set to 4
![]()
Once you have the NFS Service running you then need to configure the NFS Share.
This is done from the "Sharing" tab in FreeNAS, select "UNIX(NFS)" just under that you will see a tab "Add Unix (NFS) Share" click that to add a new NFS Share.
Again as security is not really a problem on my network I setup the following (you can always change the security later)
Comment: this is a reference I called mine PXEBoot
All Directories: this is checked
Maproot User: I mapped the "root" user not that secure but less hassle later
Maproot Group: I mapped the default wheel group
Path: for ease this is set to the same directory as the TFTP Server, it can be set different if needed but is just one more thing to remember later.
Click "OK" to save the changes.
Step 3 - Installing the PXE Boot files.
Download the PXELinux boot files, these can be downloaded from the following link, they are included in the syslinux download.
https://www.kernel.org/pub/linux/utils/boot/syslinux
Note: (I am not sure what version I used myself, from memory it was one of the 4.0X versions, but it should not matter too much)
Once you have downloaded a syslinux version, extract and open the syslinux directory, from the following folders copy the files listed below to your TFTP Root directory..
- Folder: com32/menu - select the files menu.c32 and vesamenu.c32
- Folder: com32/modules - select the files chain.c32 and reboot.c32
- Folder: gpxe - select the file gpxelinux.0
- Folder: memdisk select the file memdisk
You should end up with your TFTP root directory containing the following files:
- chain.c32
- gpxelinux.0
- memdisk
- menu.c32
- reboot.c32
- vesamenu.c32
With the correct files in the TFTP root directory, the next step is to create the Configuration file location.
Within the TFTP root directory create a folder called "pxelinux.cfg" in that new folder create a file called default with no file extension, create a default.txt file if easier and then delete the .txt at the end.
Next open the "default" file in a text editor and paste the following into the file.
ui menu.c32
menu title OpenELEC
label OpenElecGen3.06
menu label OpenElecGen3.06
kernel openelec/Gen306/KERNEL
APPEND ip=dhcp boot=NFS=192.168.1.254:/mnt/Photos/PXEBoot/TFTP/openelec/Gen306 disk=NFS=192.168.1.254:/mnt/Photos/PXEBoot/TFTP/boot overlay
label OpenElecGen3.17
menu label OpenElecGen3.17
kernel openelec/Gen317/KERNEL
APPEND ip=dhcp boot=NFS=192.168.1.254:/mnt/Photos/PXEBoot/TFTP/openelec/Gen317 disk=NFS=192.168.1.254:/mnt/Photos/PXEBoot/TFTP/boot overlay
The IP Addresses will need to be edited to match the IP Address of your own NFS Server.
The NFS mount points need to be typed exact as they are for each OS.
Far more options are available for the PXE Boot menu than I will cover in this guide, following are what works to boot the OpenELEC XBMC.
- ui menu.c32 - This option loads the boot menu for selecting your boot option/OS
- menu title OpenELEC - Simply displays the name at the top of the boot menu
- label OpenElecGen3.06 - This is a reference point for the boot option
- menu label OpenElecGen3.06 - This will display in the boot menu options
- kernel openelec/Gen306/KERNEL - This points to the KERNEL file for the OS
The next 3 lines are normally on one line.
- APPEND ip=dhcp - specifies the IP address of the PC in my case it is issued by DHCP
The next 2 lines will have to be edited to match your configuration, 192.168.1.254 will need to be changed to match your NFS server IP Address, in my case it is my FreeNAS server.
- boot=NFS=192.168.1.254:/mnt/Photos/PXEBoot/TFTP/openelec/Gen306
The above line changes the boot from TFTP to the NFS file share, enabling much faster loading of the OS. On my system all the OpenELEC versions are in a separate directory under one openelec directory like..
openelec/Gen306
/Gen317
/etc .. etc
This can be handy to work out what version of OpenELEC works best on a machine. Once the PC boots I have the option to load any version of OpenELEC. On testing one version I can simply reboot the PC from PXE and select the next version.
Since OpenELEC is a fairly active project the versions may differ from the ones listed in this document, so name your menu options and file locations to reflect the newer versions.
For the closest versions to use go to the http://www.openelec.tv website.
- disk=NFS=192.168.1.254:/mnt/Photos/PXEBoot/TFTP/boot overlay
The last line points the OS back to the NFS Share and allows the saving of the booting OS. Another reason for this is that the configuration files for OpenELEC and XBMC are stored in the same location. Without this working correctly, for example if the write access to your NFS directory is too restricted, you will get errors on the booting of XBMC.
On booting XBMC if you either see a bunch of errors on the screen like "access denied" and or each time you restart the PC you have to re setup XBMC, look at the NFS permissions on the NFS share.
Step 4 - Download and extract some OpenELEC Versions:
For the closest versions to use go to the http://www.openelec.tv website, download what ever versions you think will work best with your machine. Or get all the PC Versions, up to you really.
Once you have some OpenELEC versions downloaded, save the extracted files to a folder.
Now go back to your TFTP/NFS directory. The next steps are why I made my TFTP and NFS location the same, avoiding the hassle of putting different files in different locations.
Create a directory under the root TFTP/NFS Directory called "boot", this is important or your devices will not boot.
Create a directory under the root TFTP/NFS Directory and call it what you like, I used "openelec" then within that directory create sub directories. One for each OpenELEC version you have downloaded like "GEN317", "OSS324", "ION317" etc. Name these directories how ever you like.
Next open the extracted OpenELEC directories you downloaded earlier, in each you will see a directory called "target" . Copy the "KERNEL" and "SYSTEM" files from the "target" directory to the relevant directories on your TFTP/NFS directory created in the last step. Do this step for each OpenElec Version you have downloaded.
Now we need to go back and match up the options in the default menu file we created earlier. For the above example on my system I would end up with the following..
ui menu.c32
menu title OpenELEC
label OpenElecGen3.17
menu label OpenElecGen3.06
kernel openelec/Gen317/KERNEL
APPEND ip=dhcp boot=NFS=192.168.1.254:/mnt/Photos/PXEBoot/TFTP/openelec/Gen317 disk=NFS=192.168.1.254:/mnt/Photos/PXEBoot/TFTP/boot overlay
label OpenElecOSS3.2.4
menu label OpenElecOSS3.2.4
kernel openelec/OSS324/KERNEL
APPEND ip=dhcp boot=NFS=192.168.1.254:/mnt/Photos/PXEBoot/TFTP/openelec/OSS324 disk=NFS=192.168.1.254:/mnt/Photos/PXEBoot/TFTP/boot overlay
label OpenElecION3.17
menu label OpenElecION3.17
kernel openelec/ION317/KERNEL
APPEND ip=dhcp boot=NFS=192.168.1.254:/mnt/Photos/PXEBoot/TFTP/openelec/ION317 disk=NFS=192.168.1.254:/mnt/Photos/PXEBoot/TFTP/boot overlay
Save the default file.
Now the only thing left is to start the DHCP Server that will issue the PXE Options. If you already have a DHCP server running on your network, now would be a good time to turn off the DHCP Service on that device. (depending on your network it may be best to do that from a PC with a set static IP Address.) Once the DHCP is stopped you can then log back into the Webmin control panel, click "Servers" and then "DHCP Server" at the bottom you should see "Start Server", if the DHCP Sever was already running it may be best to click "Apply Changes" .
All going well you should now be able to boot your first OpenELEC machine from the Network.
Step 5 - First PXE BOOT
Start a Network connected PC and select Network Boot, this will vary depending on the PC you have. Not all PCs have this feature but most do. If unable to figure out how to boot from the Network, you would be best to find or download the manual for the Motherboard or Computer if using a Laptop etc.
Once you have the system booting from the network, the first stage should be looking for the DHCP Server, after a few seconds you should then see the Boot Menu load with your pre defined options.
Assuming that is not an issue you should now see the system boot into OpenELEC and then start the XBMC. If for some reason the system stalls or does not display XBMC after a period of time, restart the PC and try another version of OpenELEC.
note: you must have a folder called "boot" in your TFTP/NFS root directory, if not created as in the previous steps create a new directory called "boot" now.
Step 6 - Forcing a PC to start specific OpenELEC version.
The next steps are advisable but not essential.
On finding an OpenELEC version that runs ok on your system, the next step is to make a Static DHCP lease for that machine on your network.
This is very handy if you would like to set specific options for your Media PCs, it will allow you to create specific boot options or just boot one Specific version of OpenELEC.
Log back into your Webmin control panel, click "Servers" and "DHCP Server".
Click "List Active Leases" you should see a list of current DHCP leases on your Server similar to the following.

The next step is to work out and copy the "Ethernet" MAC address of the machine you want to set, in my case it will be "00:1e:0b:38:48:82". then click "return to network and host list".
Under "Hosts and Host Groups" select "Add new host" to display the following.
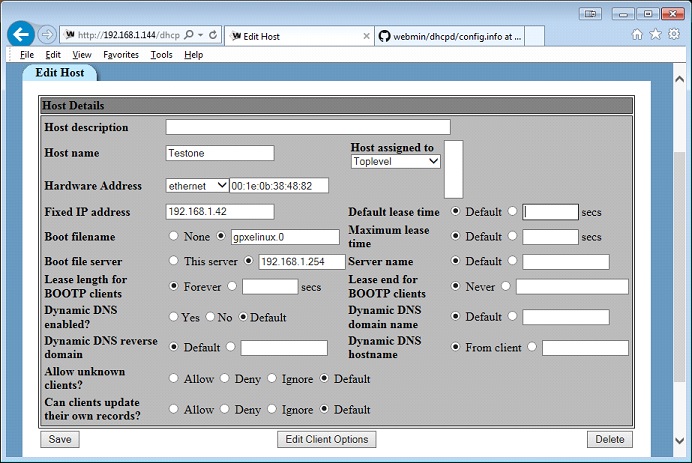
Set the following options.
- Host name: this can be set to anything you like just needs to be unique.
- Hardware address: paste the machine MAC address in my case 00:1e:0b:38:48:82
- Fixed IP address: IP address for the device also needs to be unique in my case it will be 192.168.1.42
- Boot filename: this is the boot filename as setup before gpxelinux.0
- Boot file server: IP address of the TFTP server in my case 192.168.1.254
Once the setting are done click "Save" returning back to the "DHCP Server" page click "Apply Changes" near the bottom of the page.
The final step is to create a specific file for the machine IP address you have just setup. This guide we will use the HEX value of the IP address. Go to the following website or locate one similar. Type the IP address specified in the previous step into the box, click convert and copy the HEX value in my case "C0A8012A"
http://ncalculators.com/digital-computation/ip-address-hex-decimal-binary.htm
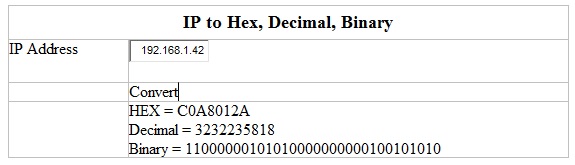
Once you have copied the HEX value go back to the TFTP root directory, open the "pxelinux.cfg" directory. Create a new file and name it the HEX value you just copied, in my case I now have a file called "C0A8012A" with no file extension.
Now in the "pxelinux.cfg" directory you should have the "default" file we created earlier and also the new " C0A8012A" file you just created.
Now open both the "default" file and the "new" file in a text editor, standard in windows is notepad for these files, you have to select open as they have no file extension.
Next copy the boot option that you found worked from "default" file location to the "new" file location.
In my case it will be the following.
label OpenElecGen3.06
menu label OpenElecGen3.06
kernel openelec/Gen306/KERNEL
APPEND ip=dhcp boot=NFS=192.168.1.254:/mnt/Photos/PXEBoot/TFTP/openelec/Gen306 disk=NFS=192.168.1.254:/mnt/Photos/PXEBoot/TFTP/boot overlay
Next you need to add a few more lines to the start of the file so it looks like the following.
#ui menu.c32
#menu title XBMC
DEFAULT OpenElecGen3.06
#TIMEOUT 200
label OpenElecGen3.06
menu label OpenElecGen3.06
kernel openelec/KERNEL
APPEND ip=dhcp boot=NFS=192.168.1.254:/mnt/Photos/PXEBoot/TFTP/openelec disk=NFS=192.168.1.254:/mnt/Photos/PXEBoot/TFTP/boot overlay
The "DEFAULT" and "label" text has to match, or the system will not boot. This is not the only way to write this file, I find this is an easy way later if you decide to add another option to the boot menu, as in the following example with the #'s removed
ui menu.c32
menu title XBMC
DEFAULT OpenElecGen3.06
TIMEOUT 200
label OpenElecGen3.06
menu label OpenElecGen3.06
kernel openelec/KERNEL
APPEND ip=dhcp boot=NFS=192.168.1.254:/mnt/Photos/PXEBoot/TFTP/openelec disk=NFS=192.168.1.254:/mnt/Photos/PXEBoot/TFTP/boot overlay
label local
menu label Boot local hard drive
localboot 0
This will give you 2 options on a 20 second time out. On timing out will boot the DEFAULT option, in this example that is the OpenELEC but you could change that to local. This configuration can be very handy if the system you use as a media player, also has a local Operating System installed on a local Hard Drive, like Windows or Linux etc.
Well that is it you should be all up and running. Of course if you did not manage to get all that going you could just install OpenELEC to a USB Drive, and boot your Media PC from that  . but then you don't get all the fun setting up PXE Network Booting
Good Luck!!!
Quicksearch
Calendar
|
|
April '24 | |||||
| Mon | Tue | Wed | Thu | Fri | Sat | Sun |
| 1 | 2 | 3 | 4 | 5 | 6 | 7 |
| 8 | 9 | 10 | 11 | 12 | 13 | 14 |
| 15 | 16 | 17 | 18 | 19 | 20 | 21 |
| 22 | 23 | 24 | 25 | 26 | 27 | 28 |
| 29 | 30 | |||||